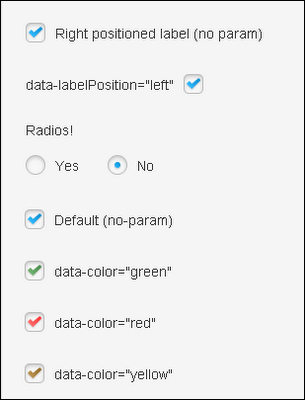
Default look of HTML checkbox and radio button is not eye catching. But now using jQuery plugin you can stylize Checkboxes and Radio buttons. prettyCheckable is jQuery plugin which replaces the default checkboxes and radio inputs for better looking ones.
Download the files and include jQuery and prettyCheckable files along with jQuery library.
This plugin also provide facility to provide inline options. All inline configs will overwrite the ones you initialized the plugin with.
Feel free to contact me for any help related to jQuery, I will gladly help you.
Features:
- Custom design
- Four color options
- Better look & size;
- Super easy implementation;
- Selectable with Tab and checkable with keyboard;
- Change events & Chaining preserved;
- More area of click/touch. A plus for mobile devices;
How to use it?
Download the files and include jQuery and prettyCheckable files along with jQuery library.
<link rel="stylesheet" href="js/prettyCheckable/prettyCheckable.css"> <script src="http://ajax.googleapis.com/ajax/libs/jquery/1.8.1/jquery.min.js"></script> <script src="js/prettyCheckable/prettyCheckable.js"></script>Write your inputs and add a class for the jQuery selector:
<input type="checkbox" class="myClass" value="yes" id="answer" name="answer"/>Setup prettyCheckable for your inputs and you're all set:
$(document).ready(function() { $('input.myClass').prettyCheckable(); }); You can start the plugin with the options you see on the documentation bellow and they will be applied to all matching inputs:$(document).ready(function() { $('input.myClass').prettyCheckable({ color: 'red' }); }); See result belowOptions:
- labelPosition: This is the position where the label for the inputs should be placed, if informed. Default is right.
- customClass: This will add a class you want to the wrapping div surrounding the input, created by the plugin.
- color: Choose between one of the four colors options (blue(default), green, yellow or red).
This plugin also provide facility to provide inline options. All inline configs will overwrite the ones you initialized the plugin with.
- data-label: If informed, this will create a label attached to the input.
- data-labelPosition: This is the position where the label for the inputs should be placed, if informed.
- data-customClass: This will add a class you want to the wrapping div surrounding the input, created by the plugin.
- data-color: Choose between one of the four colors options (blue(default), green, yellow or red).
<input type="checkbox" class="myClass" value="yes" id="answer" name="answer" data-color="green" />
Official Website


No comments:
Post a Comment